Why I'm trying self hosting
Since the birth of my children I'm quickly running out of cloud storage. Before, my life was sufficiently boring that I could fully document it with about 1 GB of image data per year. That rate has increased to 20–30 GB per year, as I now record video to document each laughs, cough, snore and tantrum. Like most people with an Android phone, most of this data is automatically synced to my Google account.
Granted, storing 100 GB of data on Google's cloud is remarkably cheap: about 20 EUR per year. Upgrading to the Premium plan of 2 TB of storage would still only costs 100 EUR per year; a bargain. That is much cheaper than the ~500 EUR it would cost to store 2 TB on AWS S3 for a year in the standard tier, a service with a reputation for being quite cheap. This is probably because Google expects most people will not actually use the full 2 TB of storage for which they are paying. And indeed, unless I decide to become a YouTuber or wildlife videographer, this amount of storage space would probably last me the rest of my life.
Still, it means paying for yet another subscription in a world where the concept of true ownership is continuously being eroded. As one inevitably collects ever more data over the years it becomes increasingly difficult to exit the platform, ensuring one becomes locked in to the subscription. While subscriptions are annoying, the money is only a minor concern. Managed cloud services are extremely convenient, but over-reliance on platforms you don't control also carries risk. Anyone whose YouTube account was randomly banned and whose content simply evaporated can probably attest to that. Platforms maintain the discretion to deny service to users who they deem are breaking their rules. What if that happened to your Google account and all your memories in Google photos just disappeared one day? It may be rare, but it does happen.
Now you might respond: just don't break the rules. The problem is that there is a single party who both makes and enforces the rules. Rules can change at any time, you have no control over how they are enforced, and appealing a ban decision is rarely straightforward. I have pictures of my children playing in a bathtub. Will I find recourse if an AI bot moderator scans my pictures and flags these as breaking the rules, subsequently banning my Google account? I'd rather not find out, but it seems similar cases exist. Finally, since all these services are closed source, users can not independently verify how safe and private their data is on these platforms. All one can really go off of is trusting Big Tech to act in the users' best interest, something for which they have a mixed track record. You might consider this a tinfoil hat argument, and indeed Google engineers claim the company takes user privacy very seriously. GitHub also claims its Copilot AI was trained only on public code repositories, but the model itself says otherwise. A hallucination perhaps?
What is the alternative? How, in the modern age, would you make do without Google Drive, Google Photos, and GitHub? You can store all your data on external hard disks and keep those stashed away in a cupboard, but that's not very convenient if you want to browse the data. Also, hardware does not live forever, and as devices age their propensity to break increases. It would be a pity to discover after 20 years that the pictures from your wedding are gone forever because the hard drive motor gave out.
In this article, I will explore one alternative I decided to experiment with: self hosting open source versions of similar services on hardware I control. Most of the article is a tutorial for how to build such a set-up yourself and the rationalle for the decisions I make; essentially they are my notes. Then I will also evaluate whether doing this is worth it, and what the benefits and drawbacks are. I want to immediately add a disclaimer up front: by no means should this article be interpreted as me declaring best practices in any way. If you decide to experiment with this kind of set-up, you take full responsibility for the integrity of your data and the security of your systems.
What we will build
A Raspberry Pi server running in your house that hosts alternatives to popular web services like:
- Nextcloud, a self-hosted alternative to Google Drive or Dropbox
- Immich, a self-hosted alternative to Google Photos
And for developers:
We will also set up secure access to your services from outside your house using Wireguard and duckdns.
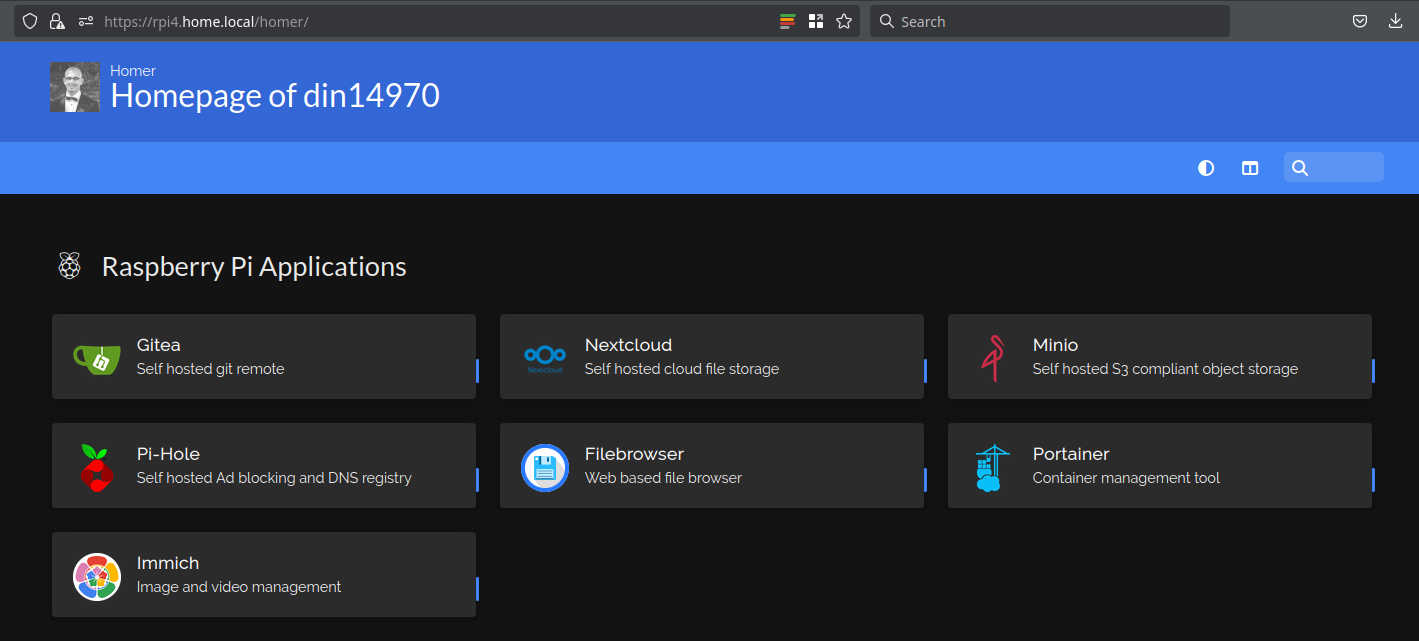
You could then also create a dashboard with links to all your services:
Who is this article for
People who own a Raspberry Pi that has been collecting dust in a cupboard, and who have ambitions to set up a mini homelab. However, they have no experience and have trouble finding a comprehensive resource to set something up. I tried to make this beginner friendly, but some familiarity with Linux and a terminal are beneficial.
The hardware you will need
- A Raspberry Pi 3 Model B or newer. An ARMv8 (64 bit) processor is required. For flexibility in the services you are able to run, a Pi 4 Model B or newer with 4 GB of RAM or more is recommended. I'm using a Pi 4 model B with 4 GB of RAM (~40 EUR).
- A micro SD card of 1 GB storage capacity or more. If you will store user data on the card itself instead of on external disks (not recommended) consider buying one with larger capacity. I had a spare of 16 GB lying around (~10 EUR).
- A computer that can read/write SD cards, or an external SD card reader. You need this to flash the operating system.
- An Ethernet cable connection. It is possible to use WIFI on the Pi instead of Ethernet, but data transfer rates are much slower and the connection is much less reliable.
- (Optional) a keyboard, monitor, and USB-C-to-HDMI connector.
- (Optional) one, two or more external hard disks (HDD or SSD) and a USB hub that has its own power supply. I'm using two 4 TB Western Digital HDDs (~200 EUR) and a TP Link USB 7-port USB hub (~30 EUR)
- (Optional) a case for the Pi that has a fan for active cooling (~20 EUR). The Pi 4 tends to run quite hot with only passive cooling.
Installing the operating system
The first step is installing an operating system on the Pi. The operating system (OS) we will use is Dietpi. Dietpi is a very slimmed down version of Raspbian, the default OS for the Pi based on Debian Linux. We use Dietpi for a number of reasons:
- The OS by itself it requires very little resources, so we can use most of the resources for running the services we care about.
- It is based on Debian so we have a stable system often used for servers and the full power of the apt package manager at our disposal.
- It comes with a bunch of useful utilities which makes it easy to install software, keep system packages up to date, do automated backups, …
- A helpful community on GitHub and forums, good documentation.
- The option to do a fully headless install. That saves us the trouble of connecting everything up to a screen and keyboard.
Download the OS image that matches your Pi model. Extract the downloaded archive. Then flash this .iso file to your SD card using your tool of choice. Currently, the official documentation suggests balenaEtcher.
This should have created two partitions on the SD card, a smaller VFAT formatted boot partition and an ext4 root partition. On the computer with which you flashed the device, mount the boot partition and edit the dietpi.txt file which you will find there. Note that you can only do this before you boot the Pi! Once you boot the Pi from this SD card, you can no longer edit these settings, so if you make a mistake you must flash the SD card again. The most important settings you should change:
- Ensure that the keyboard layout matches yours (AUTO_SETUP_KEYBOARD_LAYOUT), so that what you type is actually what you see on the screen. I use the US layout.
- Configure a static IP address for your device. This is the number you will use whenever you want to connect to your Pi. Set AUTO_SETUP_NET_USESTATIC=1 and AUTO_SETUP_NET_STATIC_IP=192.168.0.xxx, where xxx will be a number you choose between 2 and 255 (1 is typically reserved for the router itself). However, it is very important that the number you select is outside the DHCP range of your router. This is the range of numbers the router will hand out automatically to devices that connect to your network. If you choose a static address in the DHCP range, the router can get confused and try to assign this same IP to another device, which will result in your Pi losing internet connectivity. What the DHCP range is of your router you have to check in the manual or with your ISP. For my router, this was from 100–255, so I could choose static IPs between 192.168.0.2–192.168.0.99. I pick the number 42.
- Enable AUTO_SETUP_HEADLESS=1.
- (Optional) You can configure a non-default global password with AUTO_SETUP_GLOBAL_PASSWORD. The default password is dietpi. You can also change the password later. The password does not remain stored in this text file.
- (Optional) Choose OpenSSH as SSH server instead of Dropbear (AUTO_SETUP_SSH_SERVER_INDEX=-2). It uses slightly more resources but is the de-facto standard SSH server.
You can also have a look at some of the more niche options, but most things you can be changed later in the configuration once you have a working system.
Insert the SD card into your Pi, connect it to the Ethernet cable and the power chord, then boot it up. Wait for some time (10–15 min) for the OS to install itself, and you should now be able to SSH to your Pi from another machine in your local network:
ssh dietpi@192.168.0.42 # select yes and then enter the pw
If your client machine is a Mac or Linux PC, the SSH client (ssh command) should be available in your terminal. If you use Windows it may be available in Powershell, WSL, or you can try PuTTy.
If all goes well, you should be greeted by a screen that looks like this:
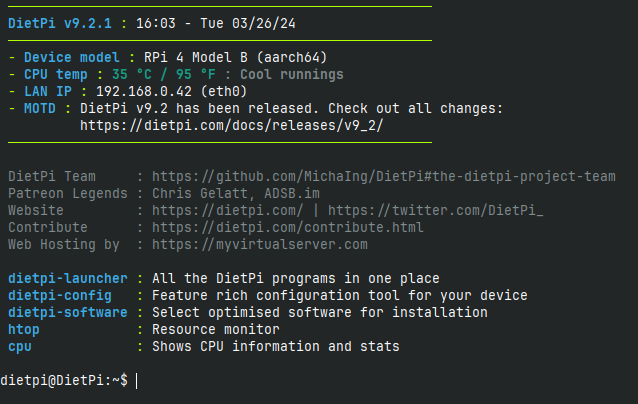
Congrats, your Pi is now a functional mini server! Believe it or not, the hard part is mostly done.
For more details, follow the official documentation.
Troubleshooting
If you don't manage to connect with SSH after some time (should not take more than an hour) then something went wrong with the OS auto-installation. You can check whether the static IP address was actually assigned by going to the configuration page of your router (usually at 192.168.0.1) and checking the IPs of connected devices. It is possible your Pi is running but at a different IP. Try to SSH to these IPs to check if it is the Pi.
If your Pi is not connecting to the router automatically then something is going wrong during the installation process, and you will sadly have to break out a keyboard and monitor. Connect everything up, then you can follow the installation process live and interact with it where necessary.
(Optional) Moving user data to external drives
By default, all data will be stored on the flash card. This has a number of drawbacks:
- Cheaper low capacity SD cards can be slow, with reads on the order of 100 MB/s and writes 10 MB/s respectively. By contrast, external HDDs can usually read and write at a speed of ~150 MB/s and external SSDs with a speed of ~200–500 MB/s. The USB 3.0 connection is not the bottleneck, as this can carry over 3 GB/s.
- There are quite a lot of reports online of SD cards getting corrupted in Raspberry Pis. I myself have had it happen twice. This is not a disaster if you keep good backups and have a restore procedure, but it is annoying. For this reason I prefer to store a minimal operating system on the SD card, and store most of the user data on external drives.
Out of the box, Dietpi supports storing most of your data (and even your root partition) externally. This section is only relevant if you bought the relevant hardware.
The set up I have is to use one 4 TB HDD to store all data. A second identical 4 TB HDD serves as an identical back-up, which is refreshed automatically each day. Hence, the worst risk in my system is that I lose 24 hours of data if my main drive dies. Unless both drives fail, I should be quite safe against data loss. For data which I consider hyper critical I also maintain a cheap cloud backup. More on that further down.
To start, connect your drives to the USB Hub, then connect the USB hub inlet to one of the USB 3 ports (the blue ones) on the Pi.
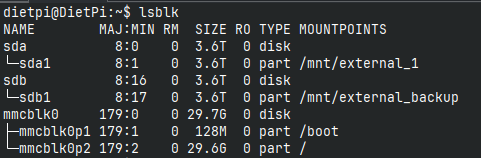
Then run lsblk to check if your drives were detected.
HDD drives will appear with a name like sdX.
Your SD card will have a name like mmcblk0.
Check how many partitions your disk has (e.g. sda1).
Easiest is if the disks have only one partition that uses the full disk capacity.
If there are more partitions, consider repartitioning your disk using a CLI based tool like fdisk, gdisk or parted.
You may have to install these with apt.
Then you should create a file system on these partitions. A commonly used file system is ext4. You can do this with:
sudo mkfs.ext4 /dev/sdXY
Once you have a file system, you can mount the drives to the file system of your OS.
Create two directories to represent the mount points for your drives.
I created /mnt/external_1 and /mnt/external_backup with sudo mkdir.
Then, mount the drives with mount, e.g. mount /dev/sda1 /mnt/external_1.
Now, lsblk should look something like this:
Then run dietpi-drive_manager, which should detect your drives and mountpoints.
It will also automatically regenerate your /etc/fstab file based on your current configuration.
This file is read at boot time and automatically mounts volumes.
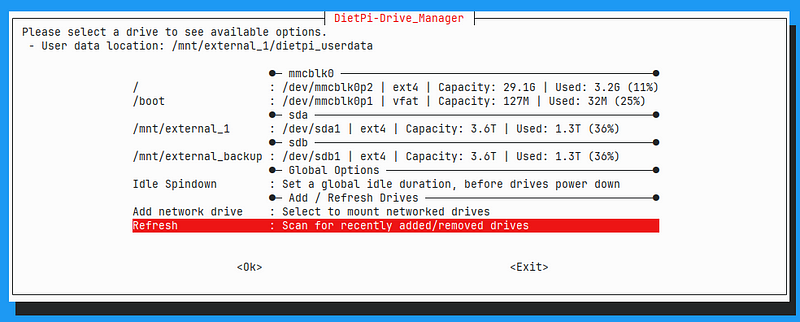
If you select one of the drives it should look like this:
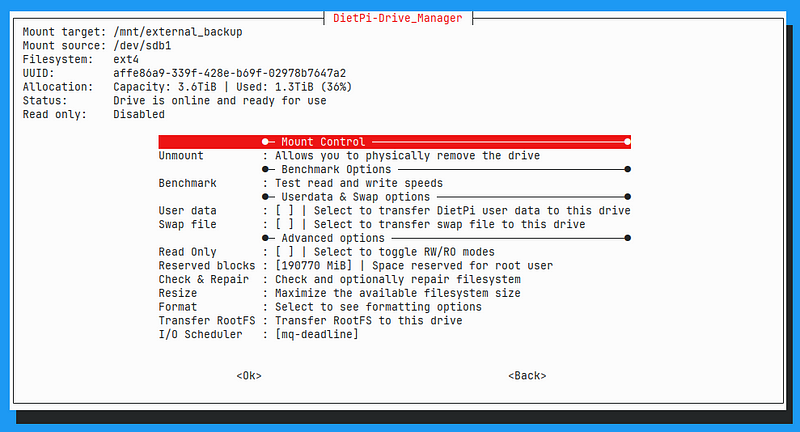
One one of the drives, you can then select to migrate user data to this drive by selecting the option.
This is the case for my /dev/sda drive.
It will copy over all data in /mnt/dietpi_userdata to this drive, then replace this directory with a symlink to the mount point of the external drive.
You can check this in the /mnt directory.

In the dietpi-drive_manager menu you can also find an option to transfer the entire root file system (the / partition) to an external drive.
The /boot partition must remain on the SD card; a Pi can not boot from another device.
If you do this, I would recommend you do create more than one partition on the external drive, and put the root filesystem on a separate partition from the user data.
As my SD card has sufficient capacity, I am OK with leaving the root filesystem there.
There are other convenient utilities in dietpi-drive_manager, like reformatting tools and checking the integrity of the filesystem.
Creating automatic back-ups
To set up automatic back-ups of the system, we will use the dietpi-backup command:
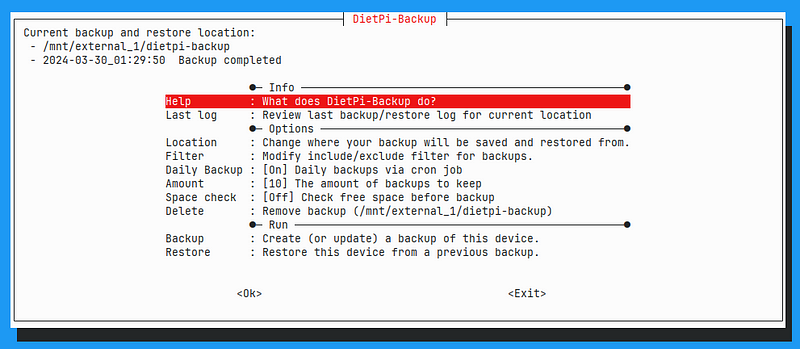
Here you can set a location for the backups (I store them on the external drive), turn on daily backup via cron, and set a number of backups you would like to keep. That's it!
If you want to restore a backup after your system crashed, you can flash a new SD card, go to dietpi-backup and select Restore.
If you want to manually create a backup, just select Backup in this menu.
Note that dietpi-backup will not actually create backups of the user data in /mnt, only the system! To create backups of the user data, we can use an additional utility: dietpi-sync:
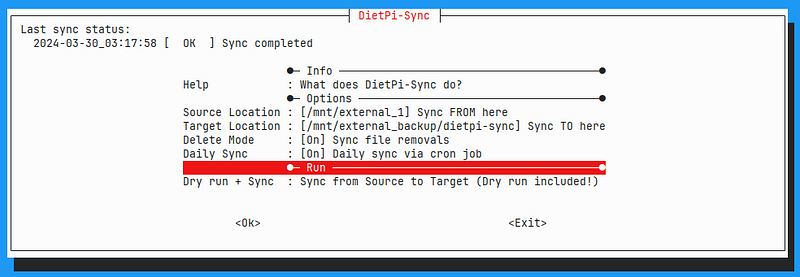
Set the source and target location, and turn on daily sync.
This syncs all the data in one directory with the data in another.
We can use this to copy everything from one external hard drive to the other.
dietpi-sync also supports syncing to network file systems like samba servers.
Note that I turn on "delete mode". If delete mode is turned off, then if I delete files in the source, they will remain on the target. This can help with situations like accidental deletions. With delete mode turned on, I should get an identical copy on both drives: deleted files on source also get deleted on the target. This does mean that once the sync happens, deleted files are gone forever.
Alternative options: RAID
Instead of running a daily sync operation between two drives, it is also possible to configure them as a RAID 1 array. Here is a nice tutorial on how to set this up on a Raspberry Pi, although the narration is in German.
With a RAID array, the drives will look like a single storage volume, with one drive automatically mirroring the other. As long as one drive is alive, the RAID array will continue to work. In my setup, if my main drive fails, I have to perform manual intervention to revive the system.
Another big benefit of RAID is that you may get improved read performance, since the data may be read from either drive. However, write performance may be degraded.
I used to have this setup on my system but found it to be quite unstable with the Raspberry Pi and external drives. Quite often, the external drives would no longer be mounted and I would have to manually intervene to repair the system. In my current setup I have not had this happen so far. I never found a root cause for the instability of RAID; if you can get it to work in a stable manner it may be the preferred option.
Installing services
Software with built-in support
With Dietpi, installing useful software is as easy as selecting it in a menu. When you are SSHed into the Pi, run
sudo dietpi-software
You may have to enter the password you set in the previous section. This brings up the following menu:
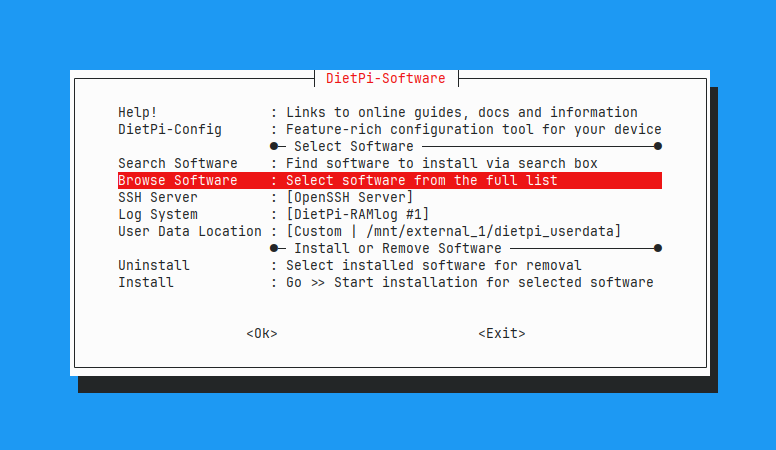
Use the arrow keys to navigate and Enter to select. Go to Browse Software, which brings up the list of all easily installable software:
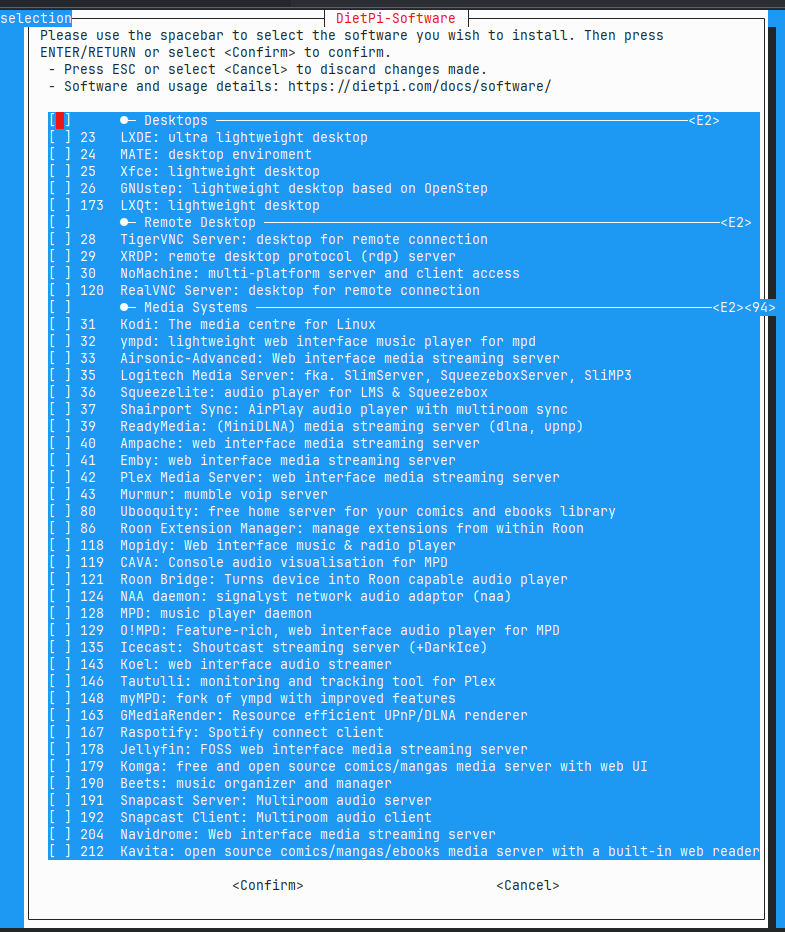
Different titles are organized by category. You will find more in-depth information in the docs. Have a look and explore what interests you. I was personally most interested in self hosted alternatives to Google drive (NextCloud), GitHub (Gitea), and Google photos (Immich). Select the software you are interested in using the space bar. Then press Enter. You will then go back to the previous menu where you can select "Install selected software".
Software without built-in support
Of course there may also be software that is not by default installable with Dietpi. But since Dietpi is simply Linux with some convenience scripts, you have the option to install software as you would on any other Linux system. If you decide to do so, I would highly suggest you only install containerized applications. Otherwise, you may install dependencies on your system which can conflict with Dietpi software titles, which could slowly break your OS. We will go through an example with Immich.
Nextcloud: self hosted alternative to Google drive/Dropbox
If you want to install Nextcloud, I also suggest you install a "webserver stack".
Personally, I always go for the LEMP stack: Nginx, mariadb, PHP.
Some of the following sections will assume you are also using Nginx.
After you have installed Nextcloud, you can access the web interface by opening your browser to 192.168.0.42/nextcloud.
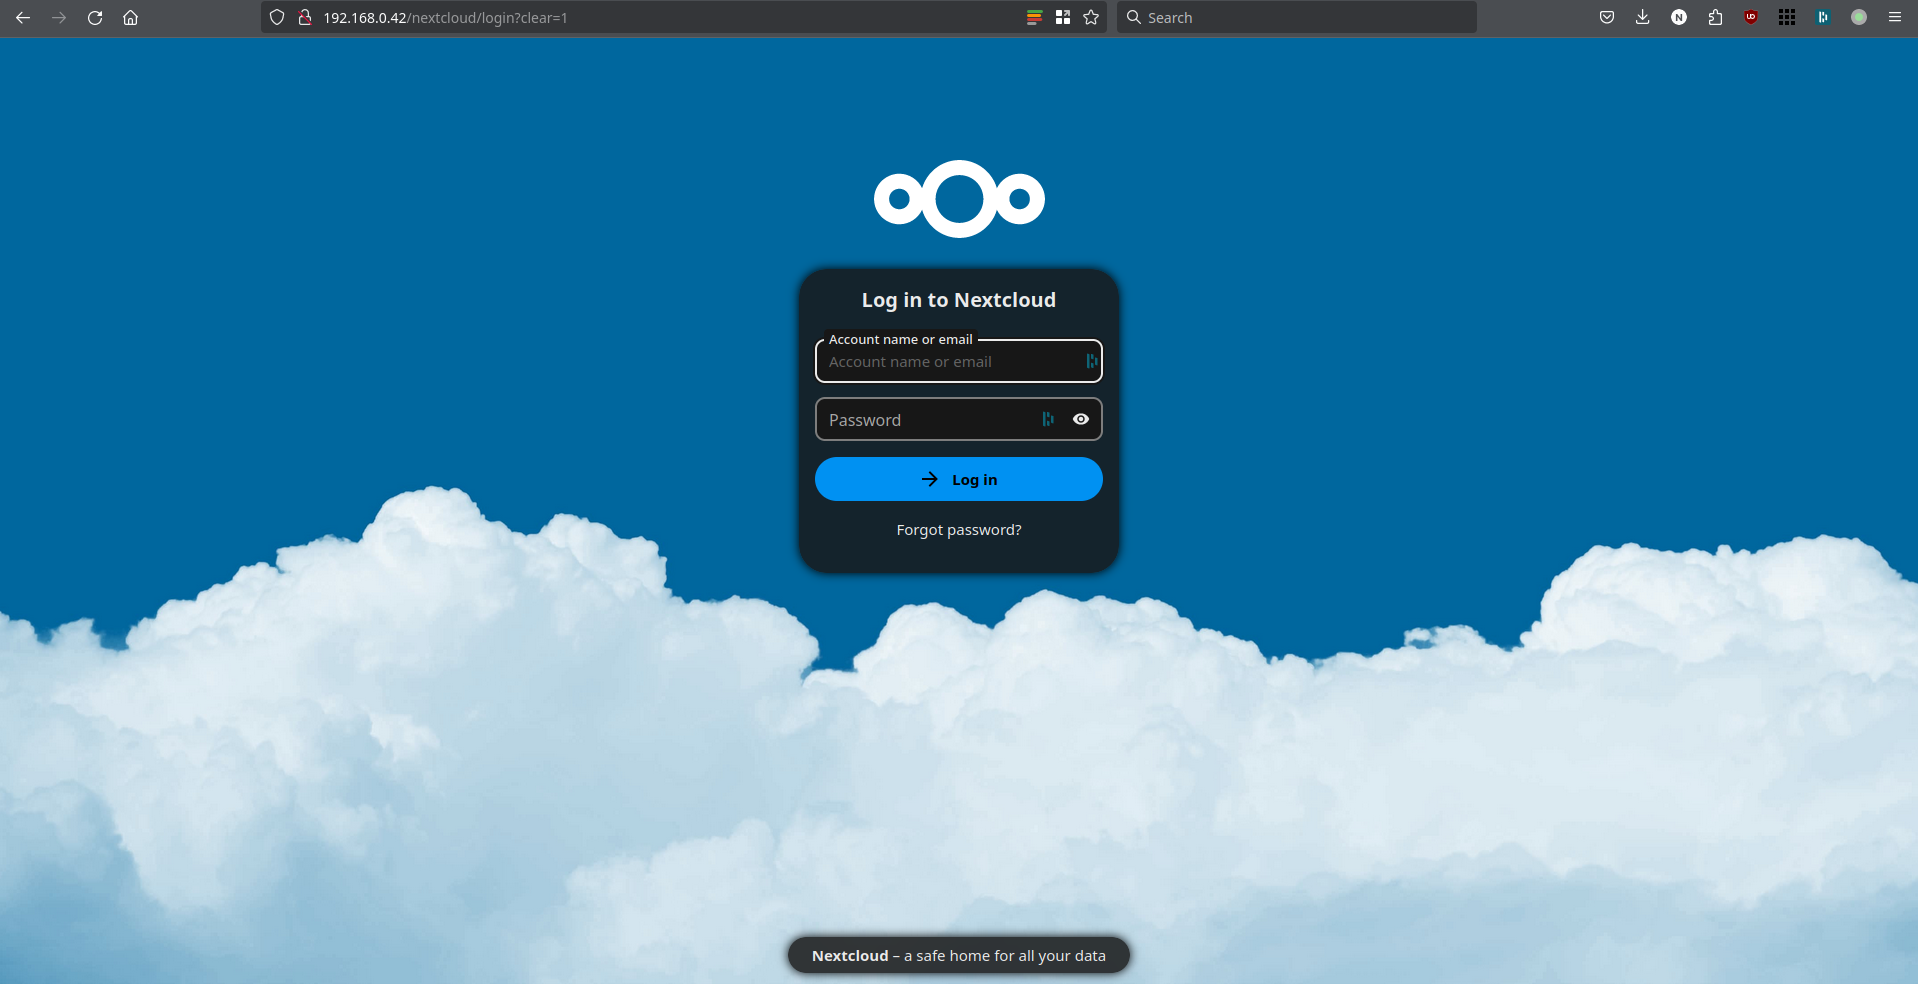
You can log in as admin using the username admin and the password you set in the previous section.
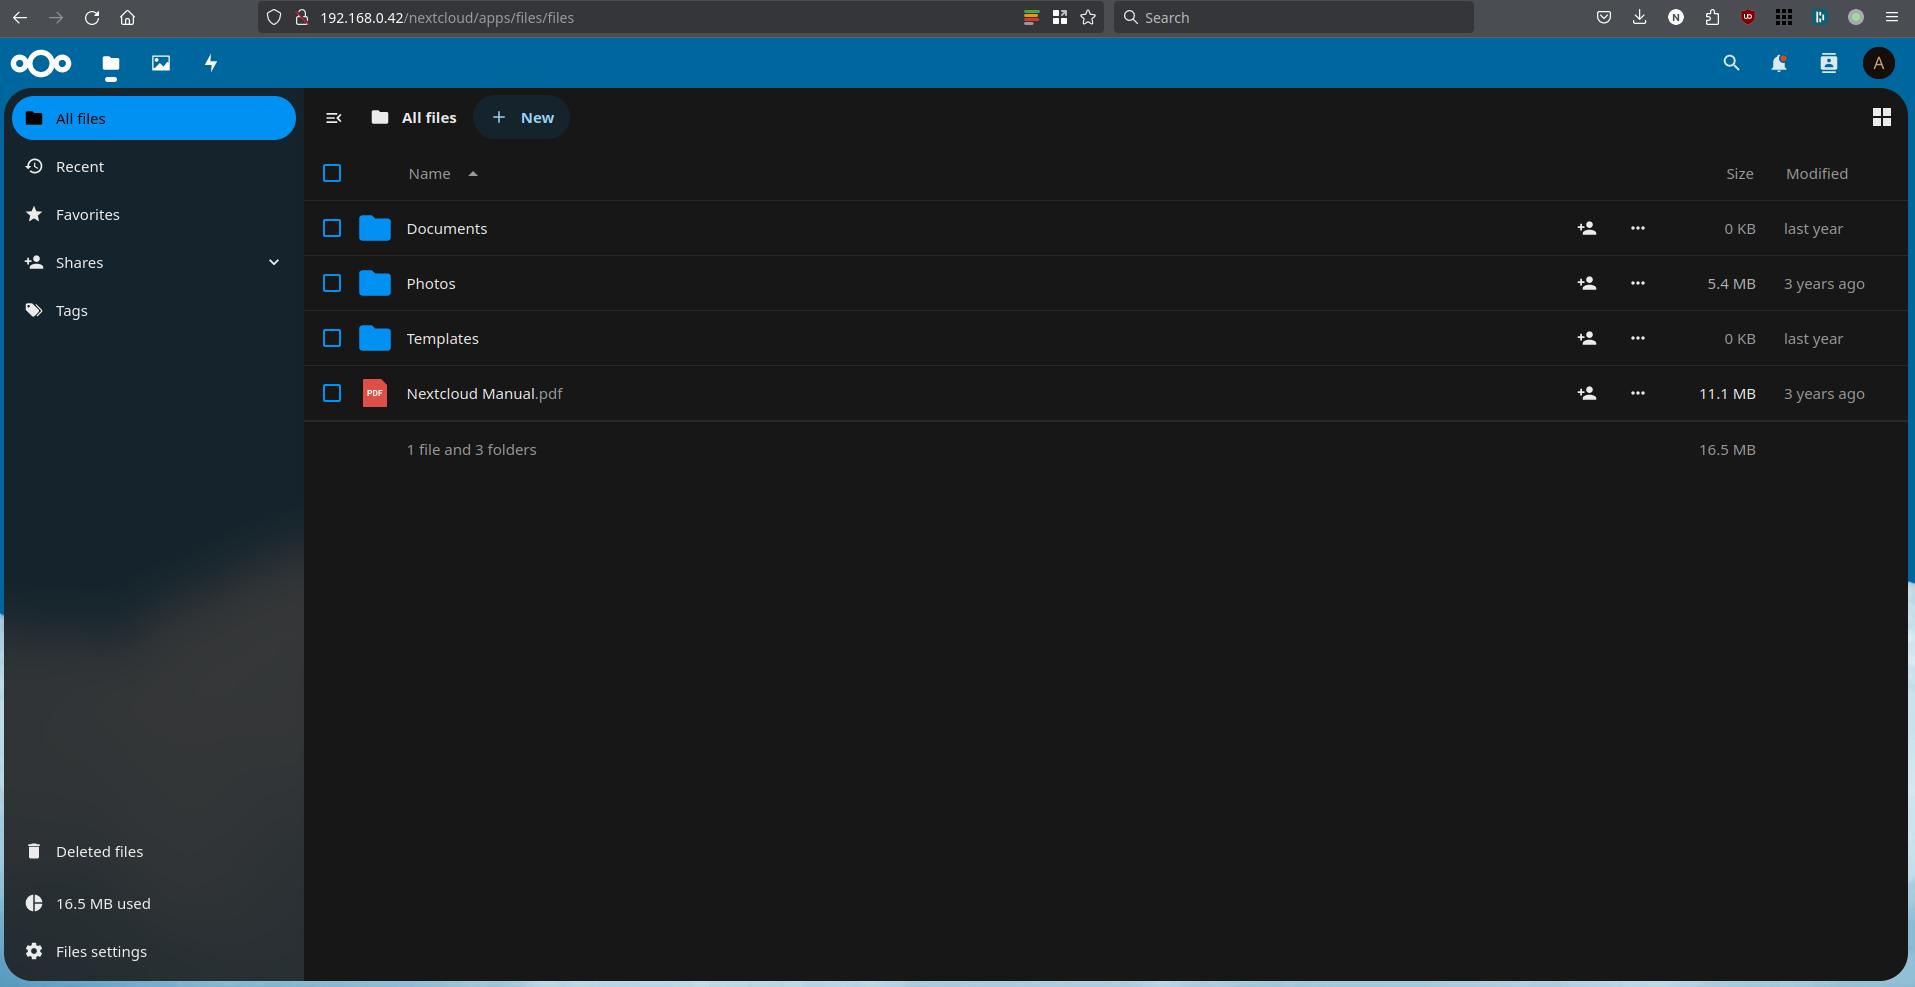
This should bring you to an interface that should look quite familiar:
It's possible you end up first on a "dashboard" instead and you have to click through to see your files. It's possible to disable the dashboard in the settings if you don't like it.
If you are the only user of the system you could keep using the admin user. However, if you have others in the house who might like an account perhaps it is better to create additional users. If you click on the top right icon, there will be a "Users" option in the dropdown. From this menu you can create and manage users.
Just like Dropbox and Google Drive, Nextcloud has a handy desktop client that allows you to sync local directories with remote directories and vice versa, as well as a phone app. Have a look here, or if you are on Linux install with your system package manager. The main differences between these clients and the ones from Google/Dropbox, is that you will have to specify the endpoint (=URL) of your Nextcloud instance.
I have yet to find features in Nextcloud which I am severely missing. Just like in Google drive, I can search through my files and share them with others (inside the house). PDF, Image and text viewing of files in the browser is supported out of the box. Perhaps one feature I can name: in Google drive, if you double click an office file it will open in Google docs. In Nextcloud, you can install an "app" plug-in for an office in the browser, but it seems quite fickle and I have not gotten it to work.
Migrating data to Nextcloud
Manually uploading all your data through the Nextcloud web interface can be quite slow. Additionally, there may be a limit on the size of file you can upload through this method (this is configurable, have a look at the Nextcloud documentation).
If you have a lot of data to migrate to your Nextcloud, I would recommend you send it to your Pi in a more direct way, put the data in the right directories, and then update the database. This is how you can do this:
- First decide whether you will send the data from one computer to the Pi over the network, or whether you will do it by connecting an external storage device to the Pi. Both may be equally fast, as the bottleneck is likely writing the data to the new storage device.
- If you will send the data over the network, consider using rsync. With rsync, all you need is SSH access to the remote server. I would recommend something like:
rsync -avhP <source directory> dietpi@192.168.0.42:<remote directory>
- If your data already exists on an external drive, it will probably be faster to attach the drive directly to the Pi's USB 3.0 ports and copy it over. Then mount the drive using
sudo mount /dev/<partition name> <mount point>. Find the name of the partition using thelsblkcommand. - Copy the data first to a location that the dietpi user has access to, like
/mnt/dietpi_userdata, as you don't need sudo rights for this. Copying this data to the correct Nextcloud directory should be a near zero-cost operation. - Nextcloud files (which you see in the browser) live in
/mnt/dietpi_userdata/nextcloud_data/<nextcloud user>/files. Copy your files to this location withsudo. - Files must have the right owner and access rights for Nextcloud to work with it. Change this recursively to
chown -R www-data:www-data <directory>
- For Nextcloud to register those files, it needs to register the file metadata in the database. This does not happen automatically when you simply copy files into the directory. To make Nextcloud aware of the files, you need to use the Nextcloud CLI, more specifically the following command (this may take multiple minutes to even hours depending on how many files you copied).
ncc files:scan --all
That's it, now your files and their metadata should be properly migrated to Nextcloud!
Immich: self hosted alternative to Google Photos
Immich is not by default installable on Dietpi, though there as been a request for it. However, the components you need to install Immich easily are available in the dietpi-software menu: docker and docker-compose.
Once you have installed Docker and Docker-compose with Dietpi, you can follow the instructions here to install Immich: https://immich.app/docs/install/docker-compose.
Since the exact instructions are prone to change, I will not repeat them here, but it boils down to creating a directory, downloading a docker compose file, creating some configuration, and running the containers with docker compose up -d.
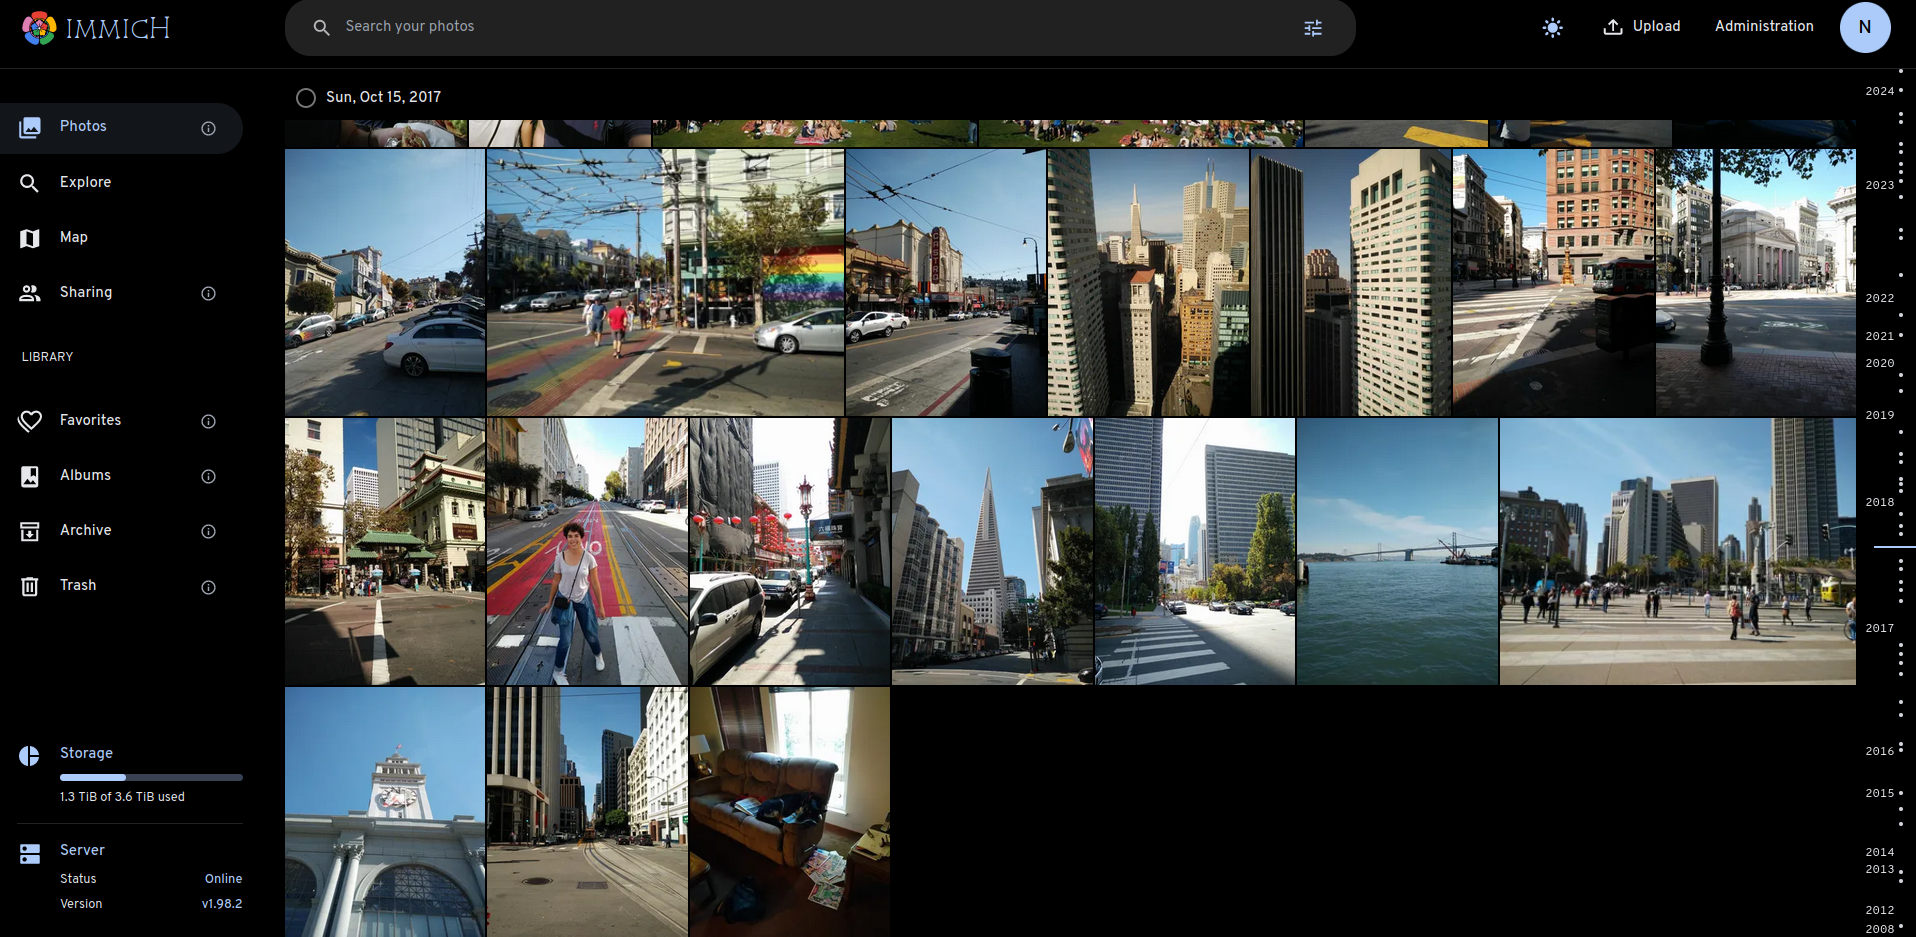
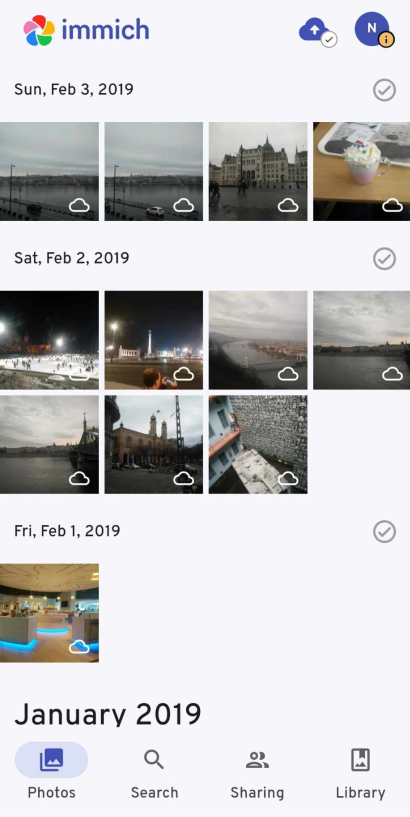
Once your containers are running, you should be able to access the web interface at http://192.168.0.42:2283. You see all your pictures and videos on a timeline:
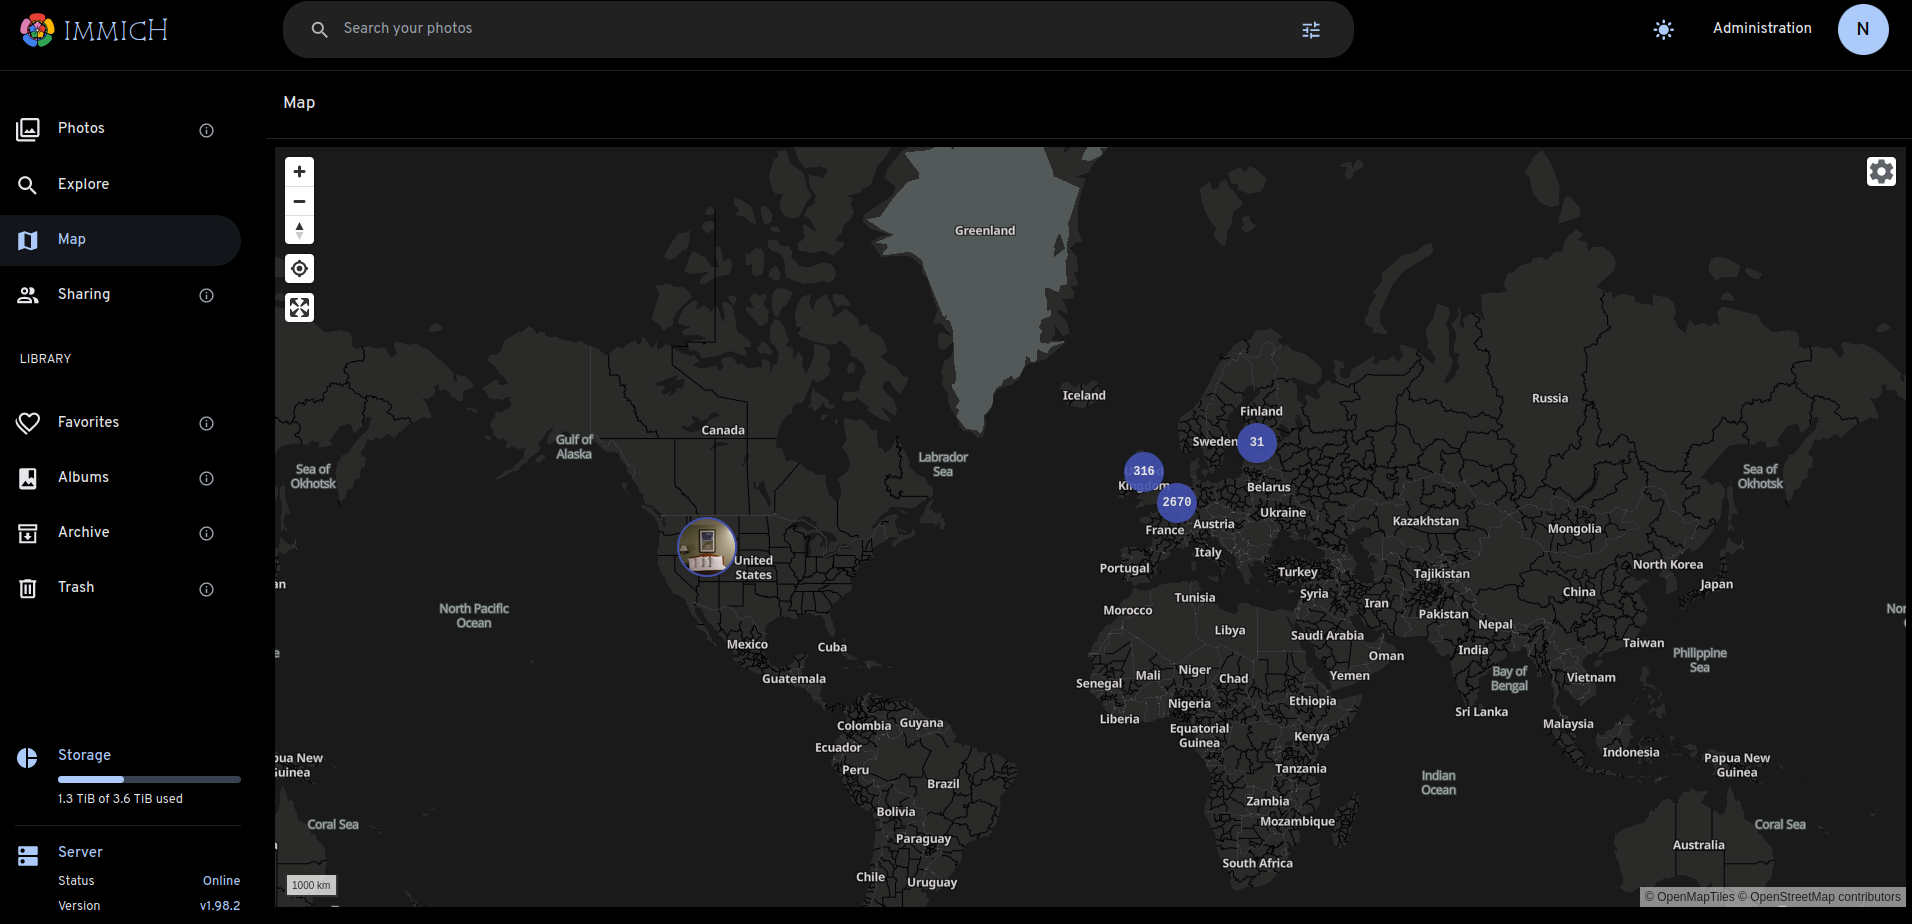
You can also explore them on a map:
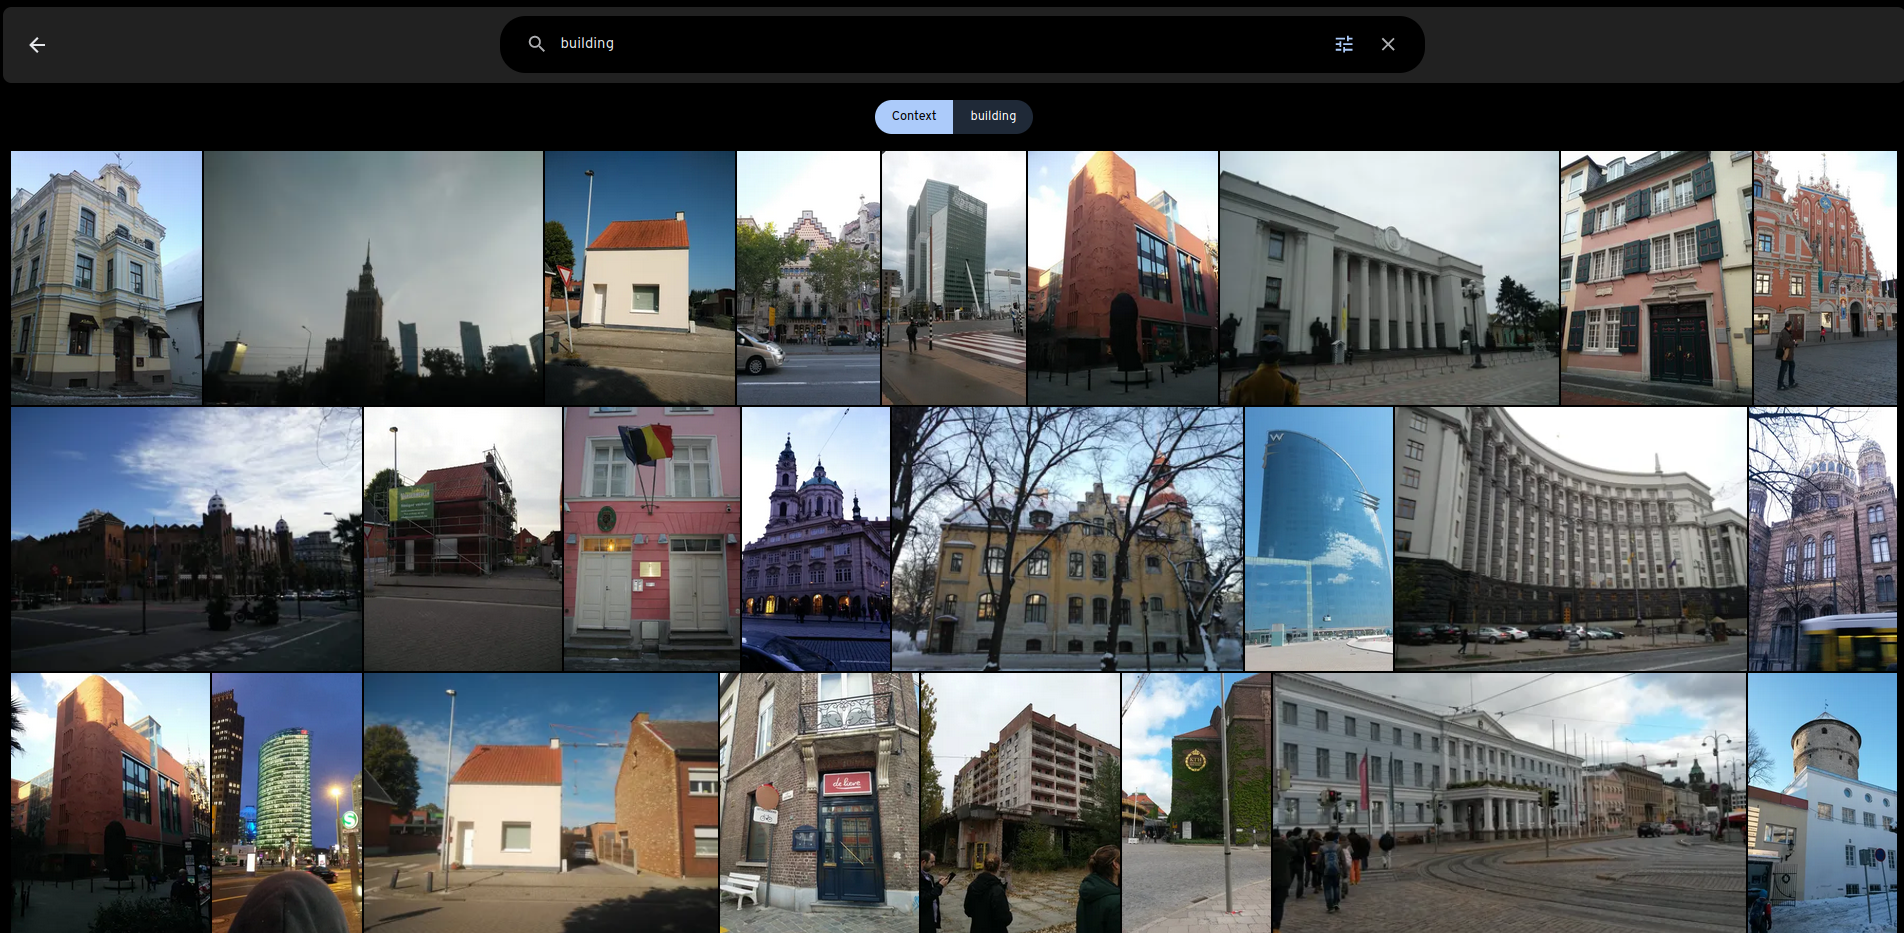
Definitely one of the coolest features is the support for semantic search (though it can be a bit slow):
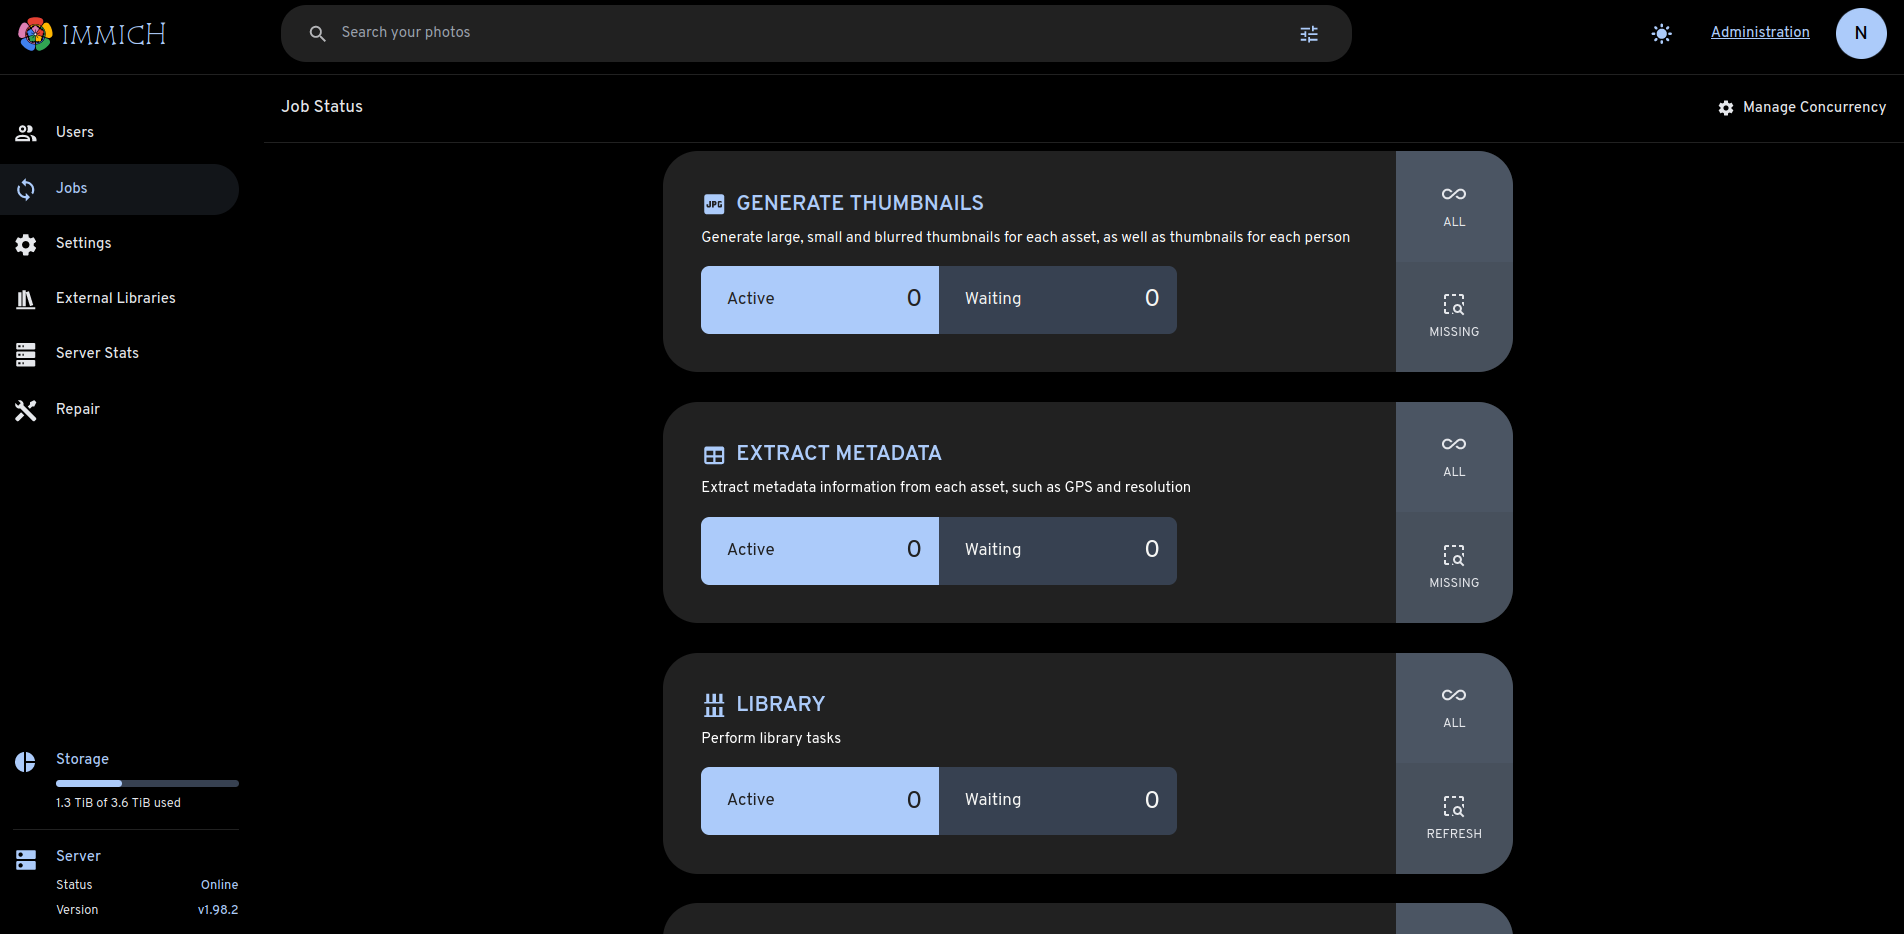
There is also the option to run the images through a facial recognition model and identify people in the photos.
You can access all these options in Administration > Jobs.
For all the capabilities of Immich and for resolving issues when things go wrong, have a look at the official documentation.
Immich also has a very sleek app that makes syncing new photos and viewing current photos from your phone a breeze:
Just search for it in your app store and connect to it by providing your IP:port combination and your login details.
To enable automated syncing of photos and video, tap the little cloud upload icon at the top:
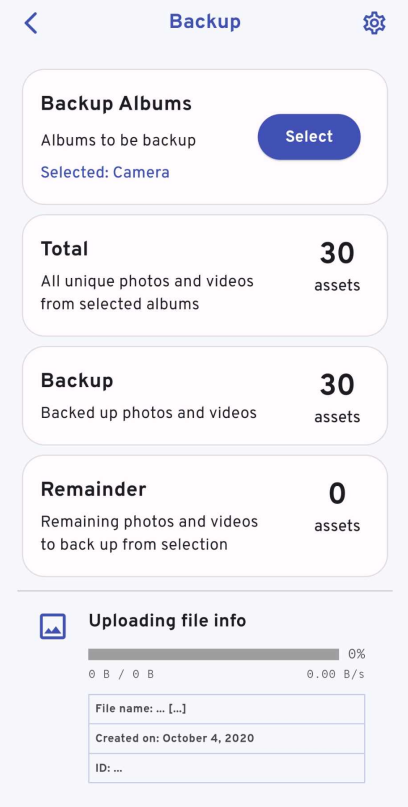
Select which albums on your phone you want to sync. I selected only the pictures and videos I take myself with the phone, but you could also select pictures you download to the device for example. At the bottom of this page you can start a manual sync.
To enable automated sync tap the gear at the top:
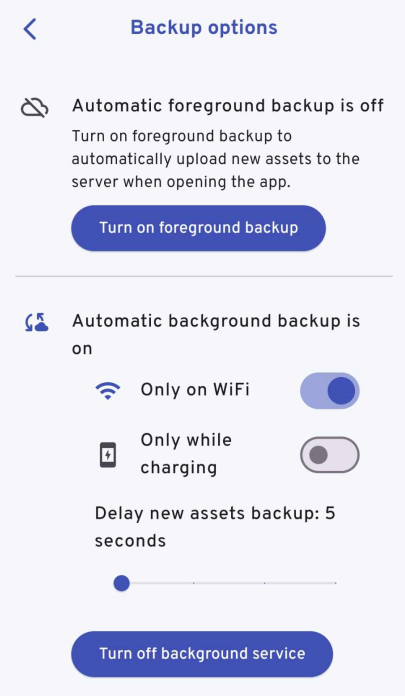
I enabled background syncing, otherwise syncing will only happen when you open the app. I have configured it so that only when I am connected with wifi will the app attempt to sync.
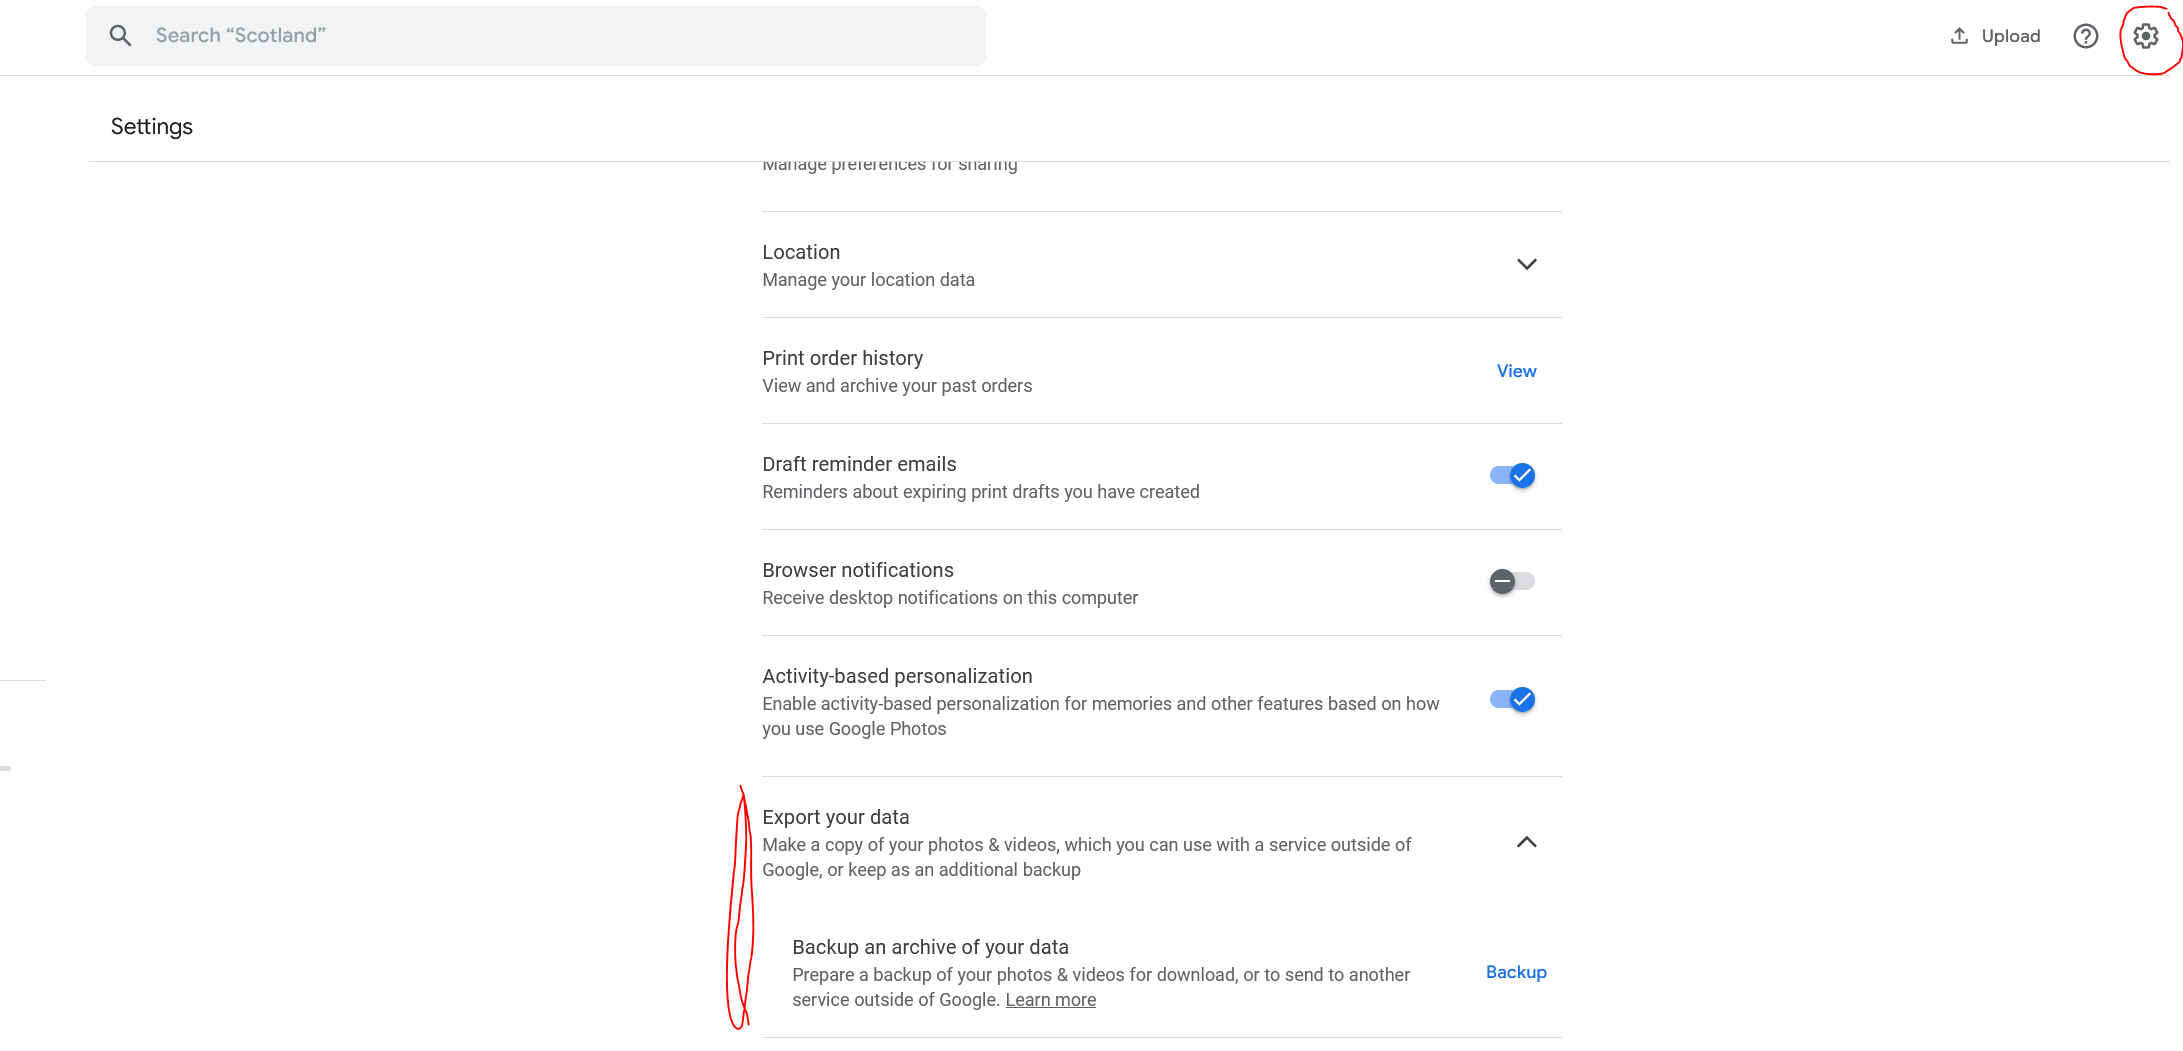
Migrating your photos from Google to Immich
The main reason to use Immich is as a replacement for Google Photos. To migrate your data out of Google Photos, go to settings and select export your data:
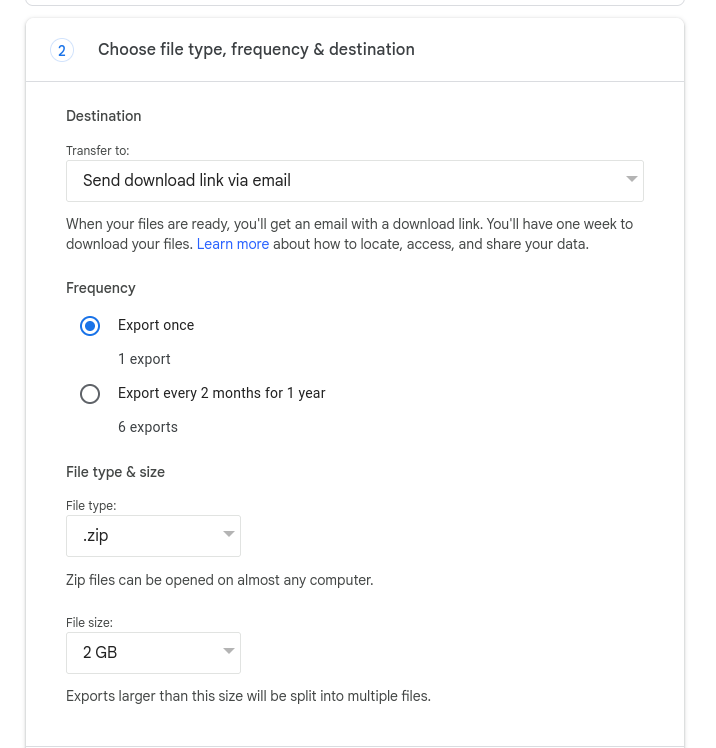
When asked what type of archive you want to use, select *.zip.
Then split up your download into a reasonable size.
If your internet is stable, I suggest selecting the largest file size, as you must click on a link to download each part separately.
After some time, you can go to Google takeout where you will find links to download all your data. Download all zip files to a directory. You don't have to unzip them.
The next thing you need is immich-go. It's a small CLI utility you can use to upload Google Takeout data directly into Immich. Download the release from the releases section and extract it. Inside there will just be a binary executable: immich-go.
You must then go to your Immich instance web interface and create an API key. Click on your profile picture circle in the top right and go to "Account Settings". There you will find a section "API keys":
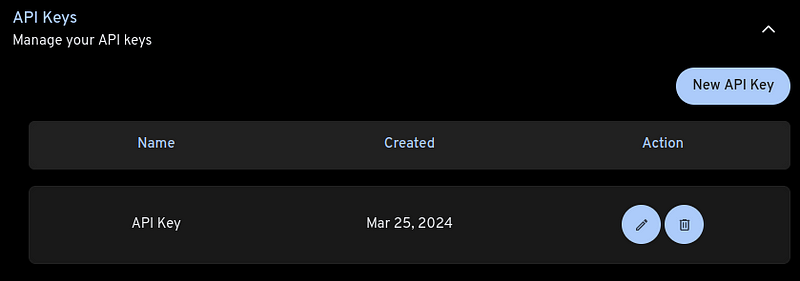
Create a new API key and store it in a safe place. The key will only be visible once.
You can now use immich-go as follows from a terminal:
# assuming you are currently in the directory containing immich-go
./immich-go -server="http://192.168.0.42:2283" \
-key="<your API key>" \
-skip-verify-ssl \
upload \
-create-albums \
-google-photos \
"<path to directory that contains the .zip files from Google takeout>"
This can take a while if you have amassed multiple years of data on Google photos. Once your photos are in, Immich also has to process them for metadata.
Gitea: self hosted GitHub alternative
Gitea is another application you can install directly using dietpi-software.
Follow additional instructions on the dietpi documentation pages.
Once you have it installed, you have your very own git remote at 192.168.0.42:3000!
After you log in (see dietpi docs), you will see an interface that is very recognizable and intuitive, at least if you are a developer and have used GitHub:
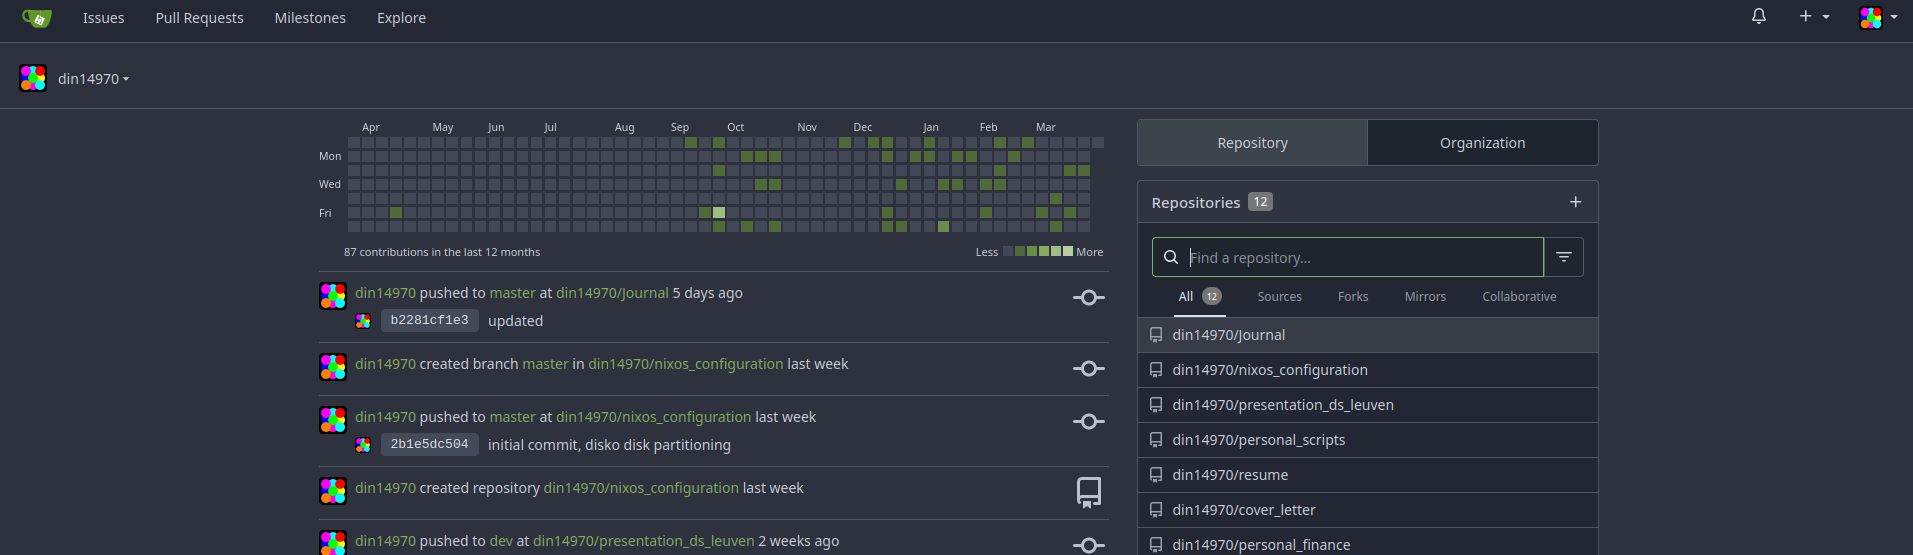
To use it as a remote in your projects, add your public SSH key in "Settings". Then follow the instructions when creating a new repository to add Gitea as your remote. Gitea has a ton of features, many of which I have not seriously explored since this is just a personal instance. The built-in capability for CI/CD is relatively new and experimenting with it is definitely on my roadmap. At this moment I mainly use Gitea as a very basic git server for storing repos that I consider highly confidential like a personal journal, so I can easily work on them from any device.
Homer: a personal dashboard
As the number of services you run increases it can become annoying to remember how to access them.
This is where a tool like homer can be helpful.
It can be installed through dietpi-software and configured through a config file /var/www/homer/assets/config.yml.
Just have a look at the example and modify as needed.
Basically you add entries like:
      - name: "<app name>"
        logo: "<url or relative path to logo>"
        subtitle: "<description>"
        tag: "app"
        url: "<local url>"
        target: "_blank" # Open link in a new tab
The page will update immediately after a page refresh.
You then just need to remember 192.168.0.42/homer (bookmark or set as start page), from which you can jump to all your other services.
Gaining secure access to your services from outside your home network with a VPN
Setting up port forwarding and dynamic DNS
Until now everything you have deployed on your Pi is only accessible from devices in your local network (LAN). The IP addresses of the form 192.168.0.xxx are only accessible from your local network; your router understands them, and a request originating from inside your LAN to one of these addresses will be properly routed.
However, outside your LAN, these IPs are meaningless. According to the internet, your house has only one IP adress: the one assigned to your modem by your ISP. If you go to a website like https://www.whatismyip.com/ you will see that IP adress. Whether you check this on your phone (connected via wifi) or on your laptop, you will see the same IP adress. In order to connect to your devices from outside your home network, you can only connect to this IP. Your modem/router then has to forward the traffic somehow to the right device inside your home network. Sending traffic to the right device can be done through port forwarding. Go to the config page of your router and find the relevant section. This will be different on every device. You will then have to enter an external port (range) that will be mapped to an internal IP:port combination. Basically you create a hole in the firewall of your router, allowing traffic in from the outside on those specific ports.
So for example, suppose you have external IP adress 12.34.56.78 and you open external port 12345 on your router to forward to internal IP 192.168.0.42 on port 2283, then anyone on the internet visiting http://12.34.56.78:12345 will connect to your Immich server.
If this external IP adress always remained the same this would be a fine (though perhaps inconvenient) way to access your home services. Unfortunately, your ISP typically does not assign you a static IP adress forever, but a dynamic one that may change at any moment. It would be a pitty if your IP adress changed just when you were trying to connect to your services. Except from inside the network, there is no easy way to figure out what the new IP adress is.
Dynamic DNS services can help resolve this issue. Personally I went with Duck DNS. Instructions on how to set it up are pretty straightforward and provided on the website. Basically, you create a subdomain like myhomenetwork.duckdns.org. It needs to be globally unique, so Duck DNS will tell you if your domain is already taken. Duck DNS then associates the IP of your home network with this domain. In the previous example, this would mean that myhomenetwork.duckdns.org will point to 12.34.56.78.
How does Duck DNS stay informed about changes to your IP adress? Basically you create a cron job on a device in your network that pings Duck DNS every few minutes, notifying it of your external IP. That way, if the IP adress changes, Duck DNS can update the IP associated with the domain. I have a cron job that runs every 5 minutes, meaning that in the worst case I will not be able to connect to my home network for 5 minutes each time my IP changes.
Setting up a Wireguard VPN server
Now you have a convenient way to access your home network, but how should you actually expose services to the outside?
You could open a port for each of the services running on your Raspberry Pi, but that is very insecure. Firstly, most of the services you expose are only exposed via HTTP, so none of the traffic is encrypted. Sending your passwords, images, and files all unencrypted over the internet is not recommended. Additionally, the more holes you create in a firewall, the larger the potential attack surface for hackers to break into your home network.
An alternative is setting up a VPN server inside your network. If you create a VPN tunnel to your home network, then the client acts as if they are connected to the LAN. The VPN connection then takes care of encrypting all the traffic over the internet. To connect to the VPN server inside your network you still will have to open an external port on the router, but only one. So the security of your home network only depends on the VPN implementation (and the modem/router firewall).
There are multiple options for self-hosted VPNs but I decided on Wireguard as it was quite easy to set up and did not require me to register an account with any external service.
Just install Wireguard with dietpi-software.
You'll have to select the port you want to run the server on and your domain name from the previous section.
After the installation, check the file /etc/wireguard/wg0-client.conf and ensure that Endpoint=<domain>:<port>.
Now ensure you enable port forwarding on your router for the chosen port and the internal IP adress of your Pi. Best to map identical ports, otherwise things could get confusing.
Test whether everything works by connecting to your home network with your phone. Disable wifi to ensure your phone is no longer connected to the LAN. Download the wireguard app. Select create a new network from a QR code. In a shell session connected to your Pi, create the QR code with
grep -v '^#' /etc/wireguard/wg0-client.conf | qrencode -t ansiutf8
Turn on the connection, then check in a browser whether you can access your services at 192.168.0.42. If you can access your services, congrats, you tunneled securely into your LAN!
The way to set up a connection from a client laptop/desktop depends on your OS. Do a Google. You can also create a wifi hotspot with your phone when it is connected to the VPN; that way a client connected to the hotspot will also be connected to the VPN.
Dietpi gotcha's
Dietpi automatically checks whether there are apt packages that can be updated.
However, it does not check for updates in the software titles that are not installed via apt.
Therefore, updating all the other software is your responsibility.
Usually applications will tell you they are out of date in the web interface.
Installing software via dietpi-software will always attempt to install the latest available release.
A lot of software are simple self-contained binaries and can be updated using dietpi-reinstall.
However, some software like Nextcloud is more cumbersome to update.
Always follow the instructions in the dietpi docs.
Additional topics
SSH convenience
Typing out ssh dietpi@192.168.0.42 and entering a password each time you want to connect to your Pi is kind of annoying.
To reduce the amount of typing we have to do, we can create a profile for the user/server combination.
On Linux or MacOS there is a hidden directory ~/.ssh, in which you can create or will find a file named config.
Open this file with a text editor and add an entry like this:
Host rpi4
  HostName 192.168.0.42
  User dietpi
Now it should be possible to SSH to the Pi using the command ssh rpi4.
To avoid having to type a password, we can work with SSH keys.
Use the command ssh-keygen and just select the default answer for all prompts.
Don't add a password to the key.
This will generate a private-public key pair in the ~/.ssh directory.
Now you have to copy the public key to the Pi.
You can do this with the ssh-copy-id -i ~/.ssh/id_rsa rpi4 command.
Enter your password for the final time, and next time you can SSH without having to enter a password.
Setting up domain names for your services
Entering IP adresses in your address bar looks kind of ugly. And if you, like me, have trouble remembering numbers, accessing services in this way is really inconvenient. Ideally, you would like to have a local DNS that resolves your custom domain names to the services you run. For example, I might want to access Nextcloud at nextcloud.home.local, Gitea at gitea.home.local, and immich at immich.home.local.
How can you set this up?
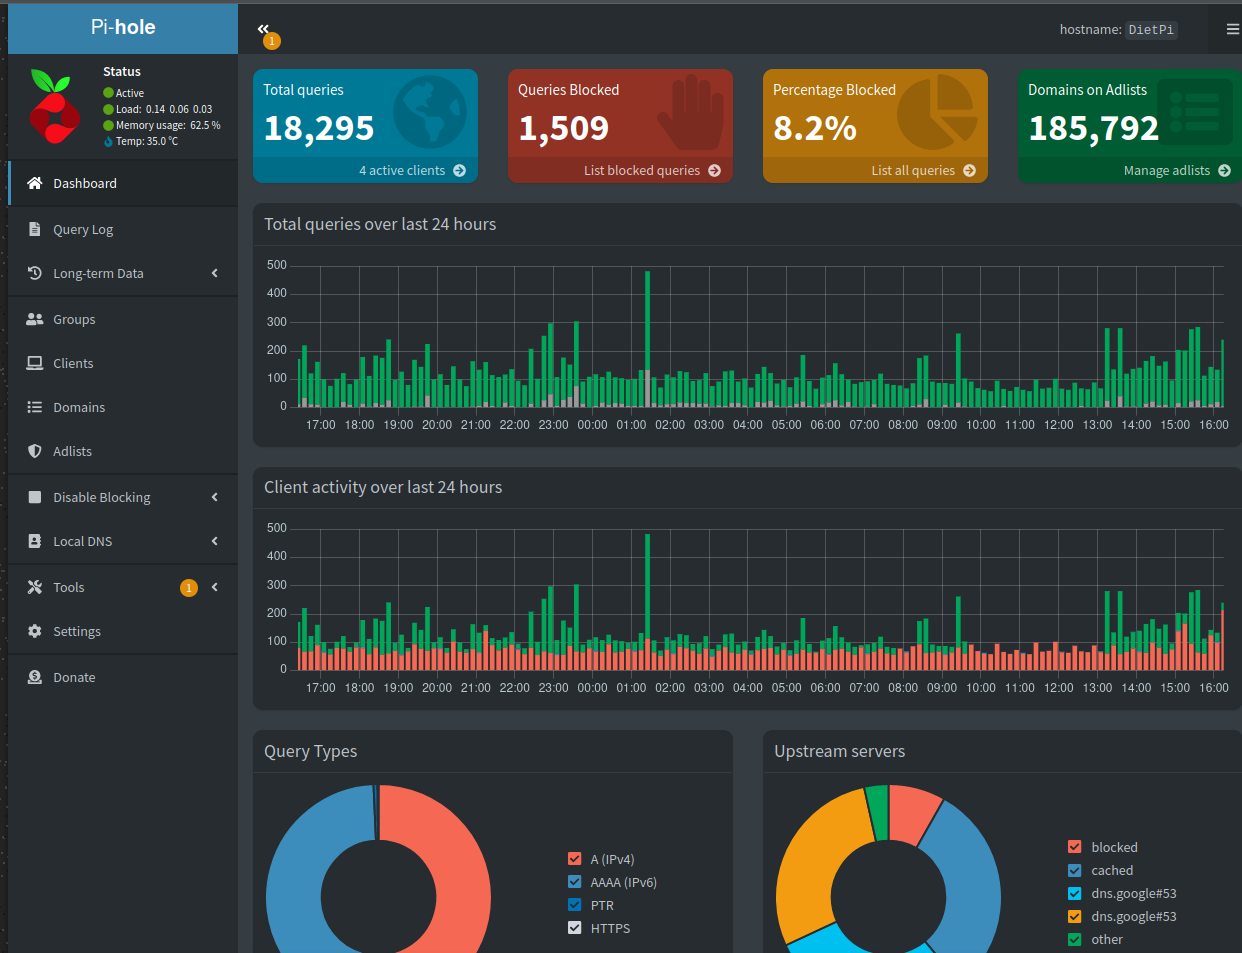
The first part of the solution is deploying a DNS server. And you guessed it, we can again do this on the Pi. Dietpi offers a number of DNS servers out of the box; I went with pi-hole, as it also behaves like a DNS sinkhole. Basically, pi-hole maintains a long list of domain names known to be associated with spam and ads, and it can block any requests to those domains. That means that a client which uses the Pi as a DNS server will see a LOT fewer ads cluttering up web pages. The benefits over ad-block are that websites don't complain about ad-block as they are not aware of your DNS server, and this works on any device and in any app that uses the internet. Unfortunately, it is not a panacea for blocking all ads. For example, YouTube ads are not blocked.
Anyway, we want to use pihole for local DNS.
Once you have pihole, go to 192.168.0.42/admin and log in with the dietpi password. This brings you to a page that looks something like this:
You can now click through to Local DNS > DNS records.
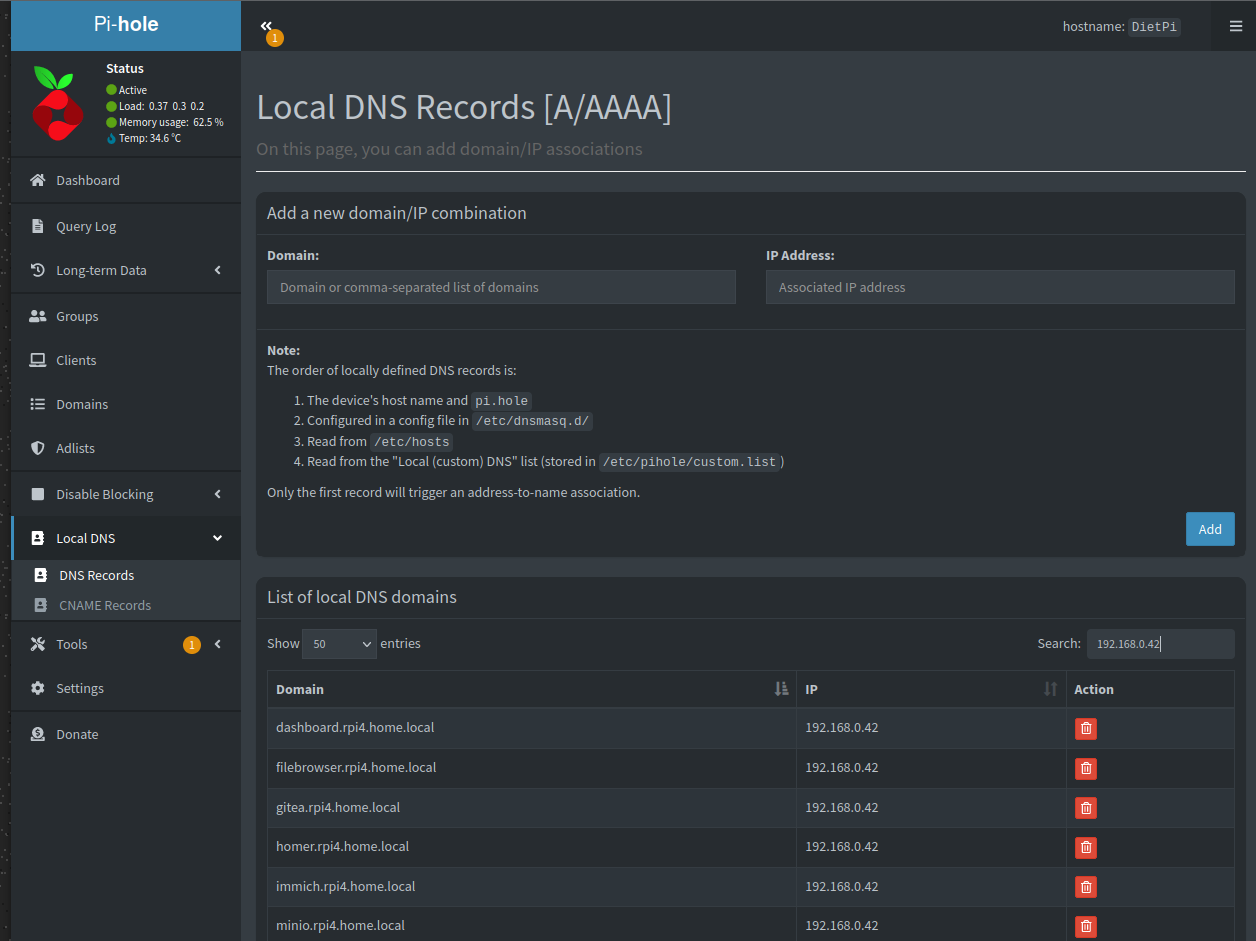
Now you can link a domain to the IP adress of your Pi. Do this for all the domains you would like to use for different services. I'm using the convention service.rpi4.home.local.
Now, you have to set the Pi as your DNS server. You can do this either on different clients or sometimes at the level of the router. If you can configure this on the router, then all devices in the network will benefit from the pihole ad-blocking, and can use the local DNS records. Unfortunately this option was locked on the router, so I configured this on client devices. How to do this depends on what device it is and what OS it is running. Have a look here for instructions on how to do it on Android, here how to do it on Windows, here how to do it on MacOS, and here how to do it on Linux.
The second step for connecting your services is configuring your reverse proxy, in my case Nginx. You may have noticed that all local domains just point to the same IP adress. It is the job of Nginx to figure out to which service it needs to forward the request.
Configuring Nginx can be a bit of a pain, but some services tell you how to configure your reverse proxy.
For example, here you will find the instructions for Gitea.
In the file /etc/nginx/sites-enabled/default you would add a block like this:
server {
    server_name gitea.rpi4.home.local;

    location / {
        client_max_body_size 512M;
        proxy_pass       http://127.0.0.1:3000;
        proxy_set_header Host      $host;
        proxy_set_header X-Real-IP $remote_addr;
        proxy_set_header X-Forwarded-For $proxy_add_x_forwarded_for;
        proxy_set_header X-Forwarded-Proto $scheme;
    }
}
The key here is we are connecting requests for gitea.rpi4.home.local to the service running on localhost:3000. You have to do a similar thing for each of the services which you want to connect to a local domain. For services (e.g. nextcloud, pihole) that all run on port 80 and are accessed via a specific subpath, the configuration may look a bit different. I have something like this:
server {
    listen 80;
    server_name nextcloud.rpi4.home.local;

    location / {
        proxy_pass       http://127.0.0.1/nextcloud$request_uri;
        proxy_set_header Host      rpi4.home.local;
    }
}
To enable your new configuration, you also have to restart nginx:
sudo systemctl restart nginx
It's possible that you mess up your nginx configuration and that the service fails to start.
To check your configuration and see warnings/errors, run sudo nginx -t.
Note 1: messing around with nginx settings is something dietpi does not take into account. Updating or reinstalling nginx may get rid of all of your configuration. In addition, some services, like gitea, expect you to access the service from a specific root url. This means you may have to change some settings on the level of individual apps to get domain names working properly.
Note 2: if you are using Wireguard to access your network from the outside, you have to set the Pi as the DNS server in the wg0 config file. In the pi-hole options you have to allow traffic from any location. See the dietpi documentation for details.
Setting up HTTPS for your services
When you connect to a service via HTTP, none of the packets you send are encrypted. That means anyone listening in on your traffic (something pretty easy to do) can pick out sensitive secrets like passwords. You would never want to connect to a service over the internet with HTTP.
In your LAN, the situation is quite a bit more relaxed. Ok, your partner or a nefarious visitor connecting to your wifi might be able to scoop your packets. Other than that, the risks of using HTTP is quite low. When you use wireguard to access your services from outside your LAN, HTTP is still fine because the VPN tunnel takes care of the decryption.
Still, as an exercise, it is possible to configure HTTPS for your services with self-signed certificates.
If you do everything manually with openssl, the process is a bit painful and there are multiple ways to go about it.
The approach I followed was creating my own Certificate Authority (CA) (basically a public and private key pair), which I then use to sign a single wildcard SSL certificate valid for 100 years for the domains *.rpi4.home.local and rpi4.home.local.
I may dedicate a small separate article for this process, but there are lots of external resources that tell you how to do this, for example this article.
Once I have a certificate + key combination (rpi4.home.local.crt and rpi4.home.local.key), I copy them to /etc/ssl/certs and /etc/ssl/private respectively.
I then create a file /etc/nginx/snippets/self-signed.conf containing the lines:
ssl_certificate /etc/ssl/certs/rpi4.home.local.crt;
ssl_certificate_key /etc/ssl/private/rpi4.home.local.key;
I then enable HTTPS for my services by adding some lines to the server blocks in /etc/nginx/sites-enabled/default:
server {
    ...

    listen [::]:443 ssl;
    listen 443 ssl;
    include snippets/self-signed.conf;
}
In the same file, I also add a block that looks like this:
server {
    if ($host = <service>.rpi4.home.local) {
        return 301 https://$host$request_uri;
    }

    listen 80 ;
    listen [::]:80 ;

    server_name <service>.rpi4.home.local;
    return 404; #
}
to reroute HTTP traffic automatically to HTTPS. After restarting nginx, I can connect to all my services with HTTPS; my wife can no longer steal my passwords!
When you simply create a CA as I have done, browsers still give a warning that your sites may not be trusted the first time you connect. You can override this by configuring the browser to trust the CA, which can be a bit fiddly.
Cloud backup for the super critical data
If my house collapses or burns down, all my data is gone. Therefore, an important recommendation for ensuring data integrity is keeping backups in geographically distinct locations. The cheapest way to do this would be to come to an agreement with a friend that lives far away. You host a copy of their files and they host a copy of yours.
But for the truly paranoid, the best approach may be to… back it up on the cloud.
That may sound like quite a contradiction if you've read the rest of this article, but hear me out. Now that you rely on your own services for easy file access, you really only need the cloud for a disaster recovery copy of files. That means you can now use much simpler, and potentially cheaper services, in a way that suits you.
The gold standard in cloud storage is probably AWS S3. Through the API or various SDKs you can easily store and retrieve files. S3 supports multiple "storage tiers", which associate different prices to different access speeds. If you store your files in the standard tier, which means you can instantly access your files, we have established that Google One can be 5 times cheaper (if you store 2 TB). However, if you store your files in the "glacier deep archive" tier, the price is 20 times cheaper than standard tier, so it would cost you 25 EUR per year to store 2 TB. The drawback is that it may take up to 12 hours to recover your files. If you lost your files due to some disaster, I would say this wait is probably acceptable in most cases.
AWS S3 also allows you to store any type of file. So if your tinfoil hat starts humming at the thought of green glowing individuals perrusing your files on S3, you can perform client side encryption before you upload anything. Your files can then only be read by you, using a password or secret key, but unless AWS loses your files you should now have a very robust backup strategy.
A tool that makes backups to all kinds of cloud backends easy is rclone.
Rclone can be installed using dietpi-software.
If you have an AWS account and credentials (access key and secret key), you can use rclone to back up a local directory to a remote bucket.
First you have to run rclone config to configure your remote.
Follow the instructions in the documentation.
Then it's as simple as running a single command:
rclone sync --fast_list --progress --size_only \
<input_dir> <remote name>:<bucket name>/<output prefix>
Rclone aims to behave in a similar way as rsync. So it will only upload files that have been modified or do not exist. Checking whether files have been changed is usually done using hashes, but this can be slow which is why the command above compares only the file size.
Note that any interaction with S3 (listing files, downloading files, uploading files) is an API call. You also have to pay for the number of API calls you make. Therefore, you may prefer to upload a few hundred archives of files (100 MB - 1 GB is typically the suggested size range) instead of tens of thousands of tiny individual files. Optimizing for the number of API calls by batching up your files is something you will may have to think through if you are dealing with millions of tiny files.
Next steps for my setup
Alerting
One of the biggest gaps in my current set-up is the absence of alerts. I have dashboards to monitor the current state of my system, but if I'm not in the habit of checking these frequently it's not so useful. Ideally, I would like to be actively informed if something goes wrong in my setup. For example, I may want to run smartctl and fsck to check the status of my drives on a daily basis, and be notified somehow if there are errors. There exists tooling like prometheus + alert manager, but I have not dug into those yet. Experiments for another time.
Simplification of NGINX config
My nginx/SSL configuration is quite hacky an unstable. Many times I've had to restore old configuration from back-up. There is a tool called Nginx Proxy Manager which promises to simplify this setup substantially.
Evaluation
Is this more cost effective that paying for cloud services?
It depends how you evaluate costs. How much do you value your time, how often do you upgrade hardware, and how pricy is your electricity? Let's make a back of the envelope calculation to compare my current self-hosting scenario with using the premium plan for Google One (2 TB of storage) at 100 EUR per year.
First, we have capital expenditures of about 300 EUR for the set-up. We estimate that in the worst case, our setup needs to be replaced entirely every 5 years. In the best case it could last 10 years. That is on average, 30-60 EUR per year on hardware.
For electricity, let's assume the Pi uses 5 W. The external hard discs usually consume negligible amounts of power when idle, which should be most of the time. However, when they do spin, it's on the order of 10 W. Let's use a conservative estimate of 10 W or 0.01 kW that we assume the system uses at all times. There are 8760 hours in a year, so the system uses 87.6 kWh in a year. In my country, a kWh of electricity costs anywhere between 0.3–0.4 EUR, so that would bring the annual cost of electricity for the Pi to 25–35 EUR. However, I have solar pannels on my roof which produce about 60% of the electricity I consume in a year, so this would bring the cost down to 10–15 EUR per year.
How much time do we have to spend on the system and how much does that cost? Setting things up, exploring and configuring new services, and migrating data can take a substantial amount of time, perhaps a week or more. But you don't have to spend that amount of time every year. Let's say spread over time, one day per year for R&D on your system. Once things are set-up and working, you may have to deal with issues, doing disaster recovery, and general maintenance (e.g. updating packages). This work may be needed more frequently but takes less time. I would estimate a total of one working day per year for this purpose. So one weekend per year to manage your system. If this is a hobby then the cost is 0 EUR. But if you consider the opportunity cost of working and earning money for two days, that could easily net you 200–300 EUR.
And so, we must conclude that, if you don't consider the time you spend on the system, you can potentially save an inconsequential amount of money, in my case anywhere from 25–60 EUR per year. Note also that this is for a system that can store twice as much data as Google One premium. Also note that we are ONLY considering Google One premium; once you start stacking various subscriptions and cloud services, costs can quickly spiral out of control. With the home server, we can easily add new services at no additional cost.
If you do consider your time, it is totally not worth it. But this argument only applies if you actually go out and work to earn money in the time that you would have otherwise spent configuring your server. If you sit on the couch and watch Netflix for two days, you also wasted the opportunity to earn 200–300 EUR.
Why would you want to do this?
Saving money is not a very good argument. The main reasons would be:
- You have a bunch of data scattered across multiple external hard drives, devices and cloud accounts. You want to centralize this data, make it accessible, and bring it under your own control.
- You like to tinker with technology, build things, and figure out how things work.
- You see this as a learning opportunity. Personally I feel like I learned quite a bit about networking, Linux and web, simply by playing with these tools.
- You feel uncomfortable handing over your data, especially your personal images and crappy code, to big corporations like Google and Microsoft.
- You like to be in control of the software and hardware you rely on. No corporation can cut off service to you.
- You want access to your data in your house even if the internet is down.
Comments
Currently the comment submission form is not active. You can add a comment via pull request.There are no comments on this article yet.